Long time no read, am I right fellow teens? Fear not, the blog is as alive as the renovation is endless. The truth of the matter is that from Nov 1 through mid December we attended 3 weddings, 2 of which were out of town, and that massively altered our ability to progress at our usual pace. We also purposefully gave ourselves some downtime given the schedule and also Brie took a full week to be a snotty mess, more on that later.
In this post I want to stay on the topic of the new privacy fence we're installing. I had previously mentioned that our goal was to install some degree of front yard fencing prior to Winter. Both dogs are very well trained in terms of sticking close to us, immediately following verbal commands (mostly Walt), and learning/respecting the boundaries of our yard. This combined with the yard having 1) a neighbor's fence running along the full north side, 2) some degree of degraded wire fencing along the east (or back) side, and a combination of neighbor fence and thick brush along much of the south side, we've been able to walk freely with the dogs throughout the backyard all year (It's not that different from free walking in the woods given the covering and wild growth).
All that said, Walt is still Walt, which means reactive to strange animals. On a handful of occasions, Walt has chased a cat in our yard to one or more yards over. Scary stuff. The good is that those were primarily in the first half of the year b/c the former home owners welcomed neighborhood strays, feeding them and letting them hunt birds on the property. The cats have learned that Walt exists and Walt has learned to listen better in those situations (he had never really seen a cat before we moved here). Our remaining fear was knowing he could see the street from the back yard and him chasing an animal out that way would be much worse than a neighboring yard.
That's the origin of the need for the privacy fence on the west side of the property, one on the both the north and south house.
This was the state of things on the last update. Holes were drilled approximately six feet apart. We opted for a privacy rather than traditional fence b/c we 1) couldn't tie into the neighbor's fence (and wouldn't want to considering its condition) and 2) couldn't set the fence directly up against the house due to where the current deck/gutter placement.
Brie and I re-rented the auger, but with an extender this time to get to the requisite 3ft depth for each hole (a third of each post has to be below ground level to ensure stability). The ground is majority clay making it a brutal slog.
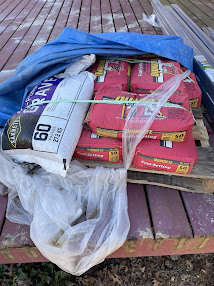
After the October dig we placed an order for 800lbs of concrete and gravel and stored that under a tarp on the deck. We also had some
SlipFence hardware delivered as we wanted a horizontal fence to add a more architectural touch to the front view.
Because the side yard has a pretty strong slope away from the house, we needed set a level guideline. We added an extension block to the neighbor's fence and ran some string b/t it and the house.
We started by filling the bottom third of each hole with gravel to provide a drainage area beneath everything. Then while Brie held the vertical posts I filled the rest of the gap around the posts with quick-set concrete and we soaked it once in place. Though the tarp protected much of the concrete, there were some large chunks that had set in bags. The price of doing this work in the rainy, late Fall. Afterward we just walked away and let it set in peace. Later Brie went back and marked on each post where the guideline hit. Eventually we'll use the angle grinder to cut the posts down to the appropriate height and cap them.

Getting these dug and installed prior to the first freeze of the season was huge. We just ordered a pallet of cedar lumber (scheduled to be delivered on 12/23) and we'll be taking the Christmas weekend to seal and cut the wood and, I presume, finish installing the fence. As for the small gaps on either side of the fence, we'll be tying down those ends with shrub or topiary installations.
As to what we want it to look like, here are some approximations.
As this was our first fencing project we wanted to achieve an attainable form of our design goal. The warm wood and horizontal lines speak to the original time period of the house and say to a passer-by that we see the fence as more than just function. I'll post updates once the fence is finished.
***
Let's talk blog plans: I have a lot of disconnected topics to post about, many of them relating to design choices we're making as we start to finish parts of the house. Instead of holding off forever on those or writing impossibly long entries, I'm going to do my own 12 days of Blog-mas, or Blogtide if you like, starting of course on December 25th, celebrating the original Nepo Baby, and running through January 5th. We will of course take January 6th off in recognition of Hill's parents attending the Capital Hill coup attempt.
I will see you all in 5 days to talk COLOR.
-S.


Comments
Post a Comment